This No-bake Orange Creamsicle Cheesecake is a refreshing treat that’s light and airy, capturing that classic orange and cream flavor. It’s perfect for those warm days when you crave something sweet!
Making this cheesecake is a breeze! Just mix, spread, and let it chill. No oven needed! My favorite part? The creamy orange layer reminds me of childhood popsicles. Yum! 😋
Key Ingredients & Substitutions
Graham cracker crumbs: These add a classic crust flavor. If you’re out or need a gluten-free option, crushed digestive biscuits work well. You could also try crushed Oreos for a chocolate twist!
Cream cheese: Use full-fat cream cheese for the best flavor and texture. Low-fat versions can work, but the cheesecake may not be as rich and creamy. Make sure it’s softened for easy mixing!
Heavy whipping cream: This gives your cheesecake that light, fluffy texture. If you want a lighter alternative, you can try whipping coconut cream, but keep in mind it will alter the flavor a bit.
Orange juice and zest: Freshly squeezed juice and zested oranges will provide the brightest flavor. If fresh oranges aren’t available, you can use bottled juice, but aim for 100% pure juice for better taste.
Gelatin: Though optional, it helps the cheesecake set up nicely. If you prefer a plant-based option, try agar-agar as a substitute; just follow the package instructions for best results.
How Do You Achieve the Perfect Consistency When Whipping Cream?
Whipping cream is key to achieving that light, airy texture in your cheesecake. Here’s how to do it right:
- Make sure your heavy cream is very cold; this helps it whip better.
- Use a clean mixing bowl—chilled ones work even better. I sometimes pop mine in the freezer for a few minutes before whipping.
- Beat on medium speed initially to avoid splashes, then increase to high once it thickens.
Stop when you see stiff peaks; over-whipping can cause it to turn grainy. It’s better to slightly under-whip than risk this! Remember to gently fold it into your other ingredients to keep that airy texture.
How to Make No-bake Orange Creamsicle Cheesecake
Ingredients You’ll Need:
For The Crust:
- 1 ½ cups graham cracker crumbs
- ½ cup unsalted butter, melted
- ¼ cup sugar
For The Cheesecake Filling:
- 16 oz cream cheese, softened
- 1 cup powdered sugar
- 1 tsp vanilla extract
- 2 cups heavy whipping cream
- 1 cup orange juice
- Zest of 1 orange
- 2 tsp unflavored gelatin (optional, for firmer texture)
For The Orange Swirl:
- ½ cup orange juice
- ½ cup powdered sugar
- 1 tsp gelatin (optional)
For The Garnish:
- Whipped cream
- Orange slices
How Much Time Will You Need?
This delightful cheesecake takes about 20 minutes of active prep time, plus a chilling time of at least 4 hours (overnight works best) for it to set properly. So, plan a little time in advance to enjoy this creamy treat!
Step-by-Step Instructions:
1. Preparing the Crust:
In a medium bowl, mix together the graham cracker crumbs, melted butter, and sugar until everything is well combined. Press the mixture firmly into the bottom of a springform pan to create a smooth, even layer. Set the crust aside for now.
2. Making the Cheesecake Filling:
In a large mixing bowl, beat the softened cream cheese using a hand mixer until it’s nice and smooth. Gradually add in the powdered sugar and vanilla extract, mixing until all the ingredients are well blended. This will be the creamy base of your cheesecake!
3. Whipping the Cream:
In a separate bowl, whip the heavy cream until stiff peaks start to form. This means the cream will look thick and fluffy! Gently fold the whipped cream into the cream cheese mixture, making sure everything is combined without deflating the whipped cream too much.
4. Adding Orange Flavor:
Now, stir in the orange juice and orange zest into the cheesecake filling until the mixture is smooth and colorful. If you want a firmer texture, dissolve the gelatin in a small amount of warm water before mixing it into the filling.
5. Creating the Orange Swirl:
In a small bowl, mix the orange juice, powdered sugar, and gelatin (if using) together. This will create a bright orange sauce that you can swirl into your cheesecake for both flavor and a beautiful look.
6. Assembling the Cheesecake:
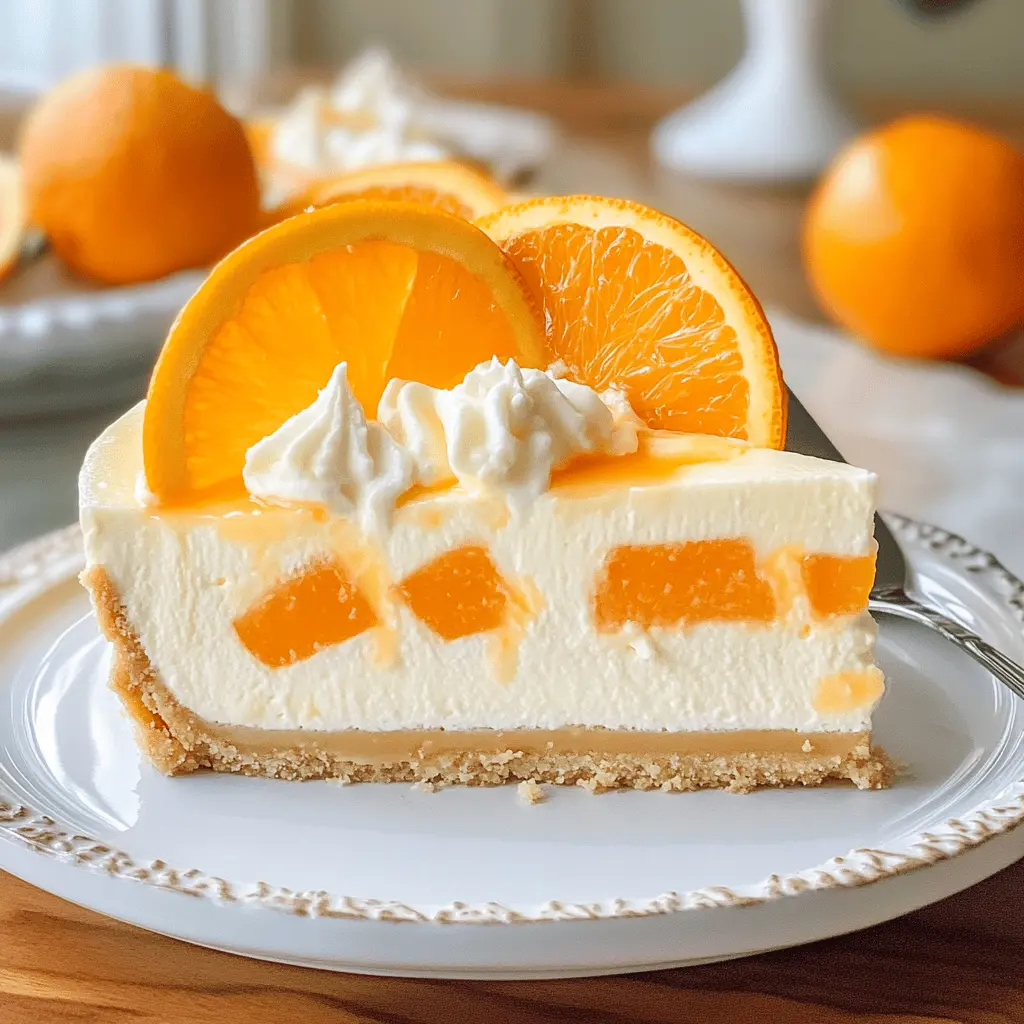
Pour half of the cheesecake filling into the prepared crust and smooth it out. Drizzle some of the orange swirl mixture over this layer. Next, pour the rest of the cheesecake filling on top, and add more orange swirl on top to create your gorgeous marbled effect! Use a knife or toothpick to gently swirl both mixtures together for a lovely pattern.
7. Chill:
Cover your cheesecake with plastic wrap and pop it into the fridge. Let it chill for at least 4 hours, or even overnight, until it’s fully set. The longer it chills, the better it will taste!
8. Serve:
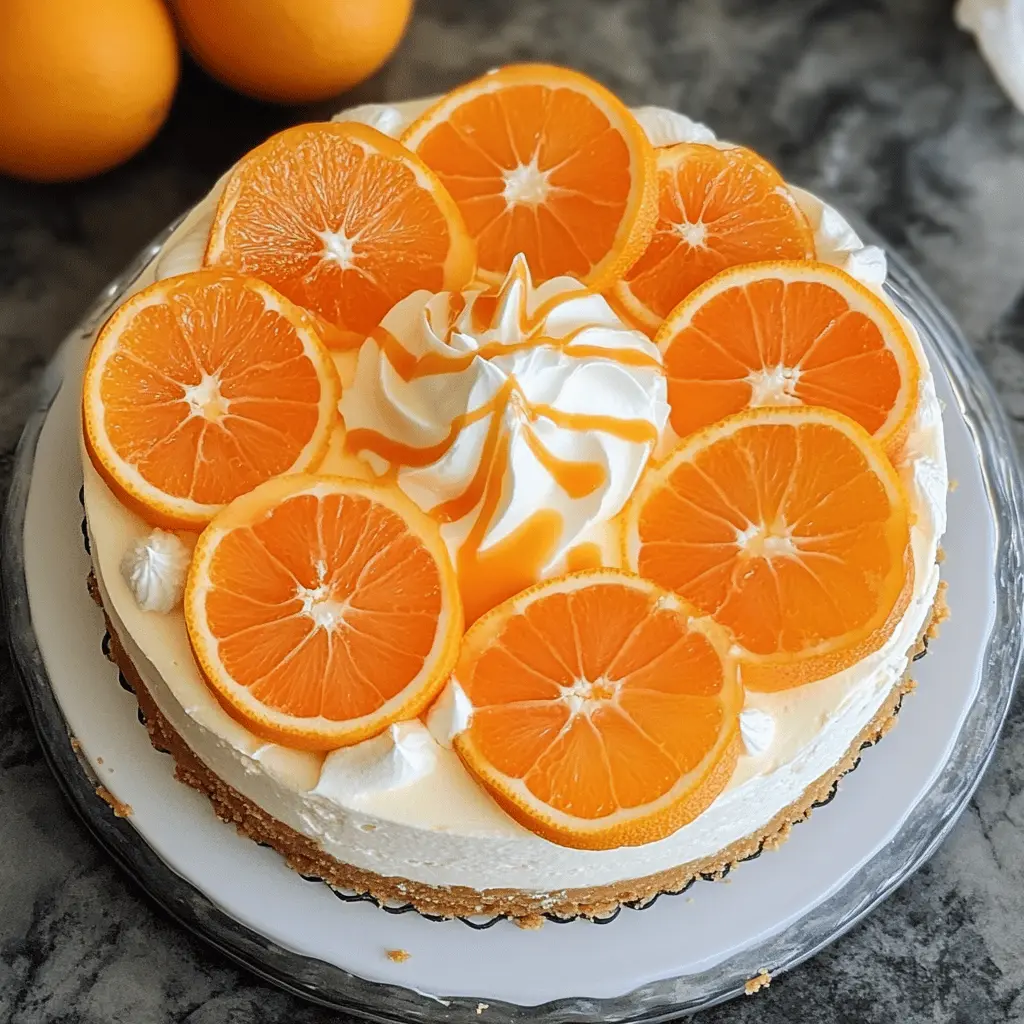
Once your cheesecake is all set, run a knife around the edges of the pan to loosen it. Carefully remove the sides of the springform pan. Top with whipped cream and fresh orange slices before serving up this refreshing treat!
Enjoy your refreshing No-bake Orange Creamsicle Cheesecake!
Can I Use a Different Type of Crust?
Absolutely! If you’re not a fan of graham crackers, you can use crushed Oreos for a chocolate twist, or try a nut-based crust such as almond or pecan crumbs mixed with butter. Just ensure the crust is firmly pressed into the pan for stability.
How Can I Make This Cheesecake Dairy-Free?
To make a dairy-free version, substitute the cream cheese with a dairy-free cream cheese alternative, and use a non-dairy whipped cream for the filling. Coconut cream can also be a great option to add richness and creaminess!
What Should I Do If I Don’t Have Gelatin?
If you don’t have gelatin or prefer not to use it, no problem! The cheesecake will still set nicely without it, but keep in mind that the texture may be slightly softer. Just ensure you whip the heavy cream to stiff peaks for added structure.
How Long Can I Store Leftover Cheesecake?
Leftover cheesecake can be stored in an airtight container in the fridge for up to 5 days. If you’re planning to keep it longer, consider freezing individual slices. Wrap them in plastic wrap and foil before placing in a freezer-safe container. They can last up to 2 months in the freezer. Just thaw in the fridge before serving!