Graveyard Dirt Cups are a fun and spooky treat! They mix crushed cookies, chocolate pudding, and gummy worms in a cup, creating a playful dessert that looks like dirt.
These cups bring out the kid in everyone, especially around Halloween! I love to top them with some cute candy graves to really make it festive. Trust me, they’re a hit at parties! 🎃
Key Ingredients & Substitutions
Chocolate Sandwich Cookies: Oreos are the classic choice for this recipe. However, you can use any chocolate cookie; just ensure they’re easy to crush. Gluten-free chocolate cookies are great for anyone with dietary restrictions.
Chocolate Pudding: Instant pudding works well for convenience. If you want a homemade touch, go for a rich, from-scratch chocolate pudding. You can also use vanilla pudding for a lighter color under the dirt layer.
Whipped Cream: Use real whipped cream for a better texture and taste. If you’re looking for a dairy-free option, coconut whipped cream makes a great alternative!
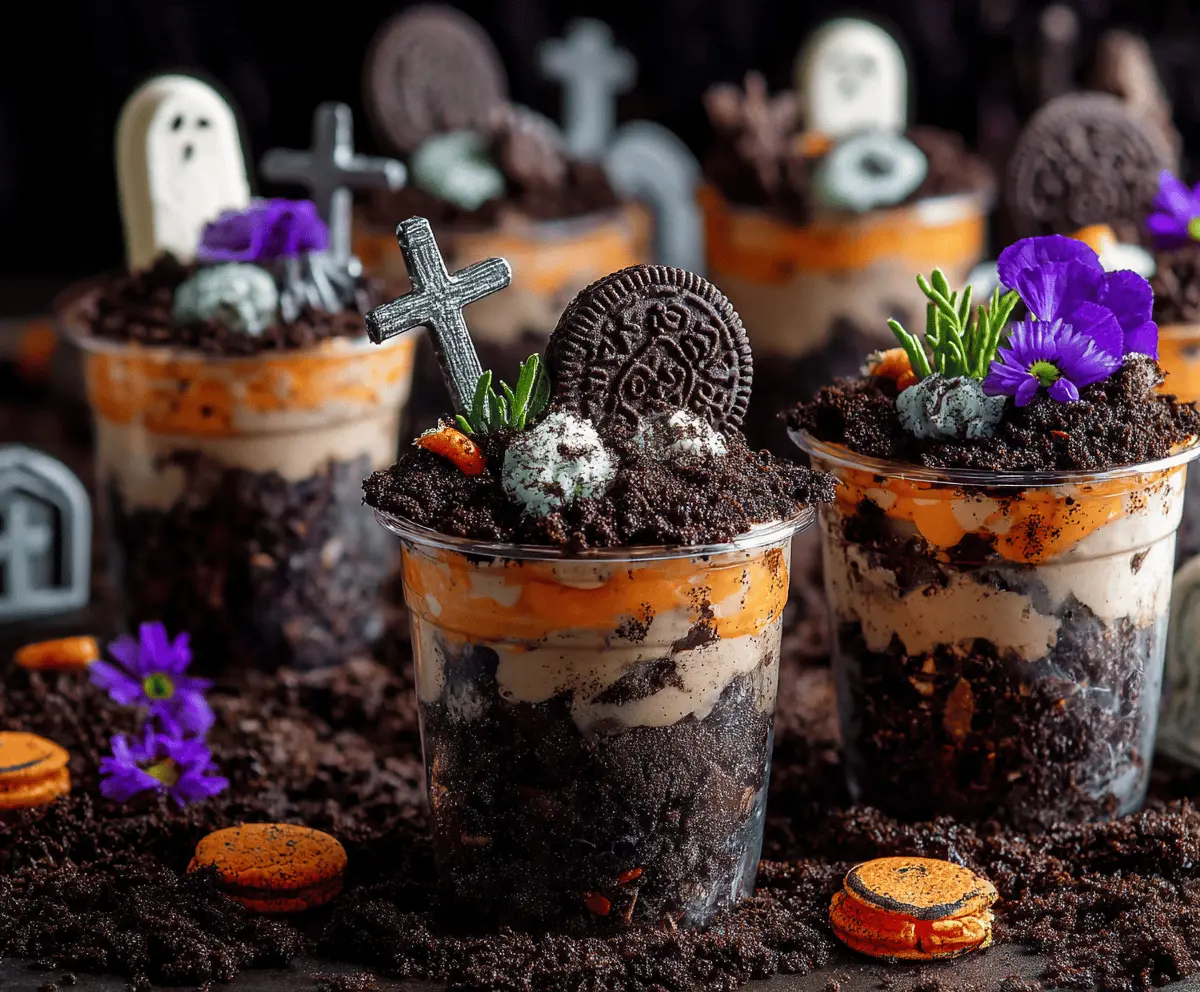
Orange Frosting: You can easily swap this with melted chocolate or caramel for a different look. If you want a healthier option, try blending sweet potato with a bit of maple syrup for color and sweetness.
Candy Decorations: While edible tombstones are adorable, you can use any candy that fits the theme, like gummy spiders or even chocolate-covered pretzels for added crunch!
What’s the Best Way to Layer the Ingredients for Visual Appeal?
Layering is key to making the cups look attractive and fun. Here’s how to do it effectively:
- Start with a clear cup to showcase your layers.
- Begin with a solid layer of crushed cookies as the base, which serves as the “dirt.”
- Pour in the pudding mixture gently to avoid disturbing the cookie layer.
- After the pudding, sprinkle on more crushed cookies — this creates a cute “soil” look.
- For decoration, drizzle the orange frosting or candy on the inside of the cup for a pop of color.
- Finally, use gummy worms and candy markers strategically on top for a spooky effect!
Layering carefully not only looks great but also makes it easier for everyone to enjoy all the flavors in each spoonful!
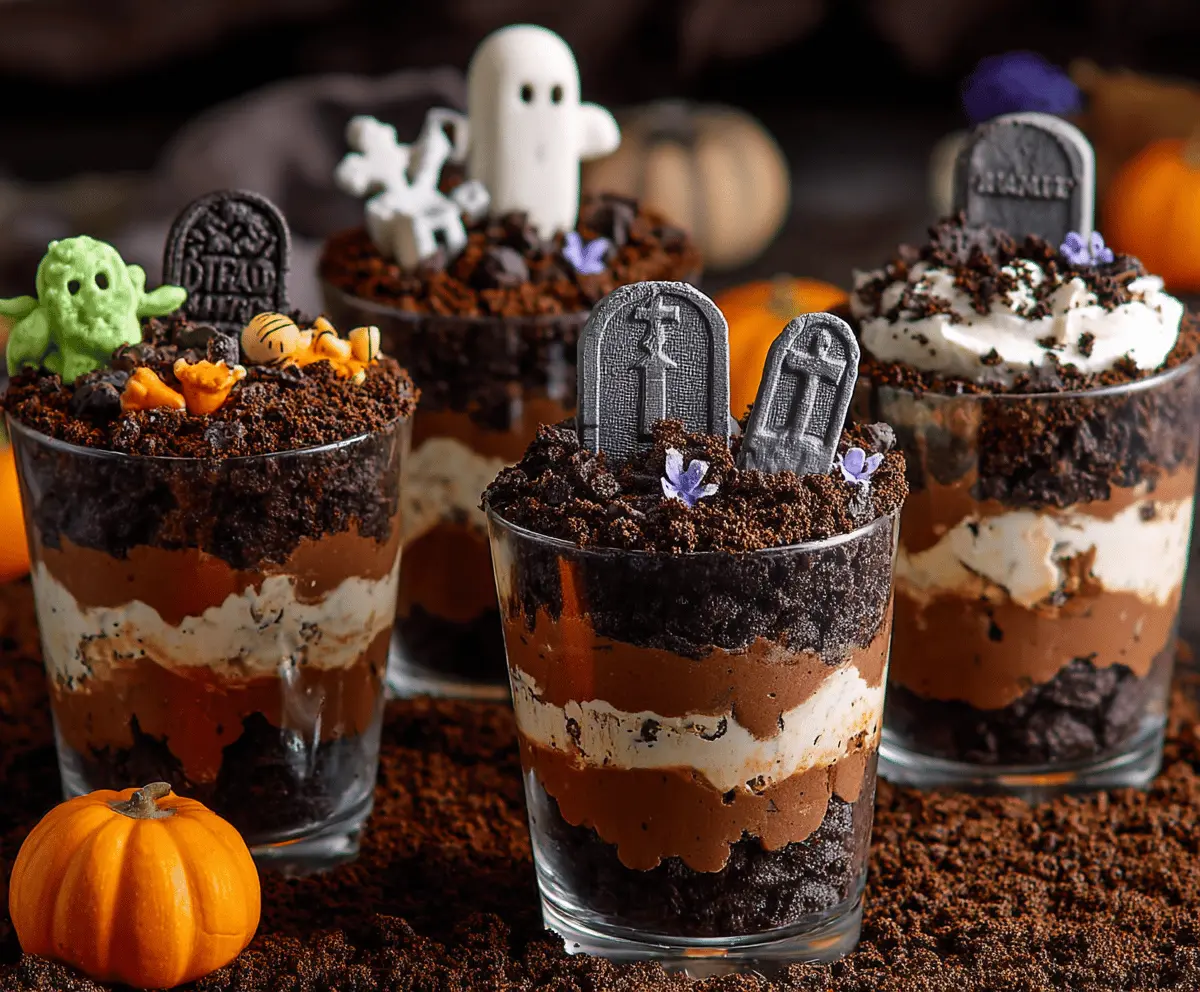
Graveyard Dirt Cups
Ingredients You’ll Need:
For the Dirt Cups:
- 2 packages (3.9 oz each) Chocolate sandwich cookies (like Oreos)
- 2 cups prepared chocolate pudding (instant or homemade)
- 1 cup whipped cream or whipped topping
For Decorating:
- Orange frosting or candy melts (for drizzling / decorating)
- Gummy worms or candy bugs
- Chocolate sandwich cookies (whole, for graves)
- Candy tombstones or decorations (edible grave markers)
- Green edible herbs or frosting for grass (optional)
- Edible flowers or decorative accents (optional)
How Much Time Will You Need?
This recipe takes about 20 minutes to prepare, plus at least 30 minutes to chill in the refrigerator. It’s a quick and easy dessert that brings a spooky twist, perfect for Halloween gatherings!
Step-by-Step Instructions:
1. Prepare the Cookies:
Start by placing the chocolate sandwich cookies into a food processor. Pulse until they become a crumbly mixture that resembles coarse dirt. Remember to save a few cookies whole or in halves to use as tombstones later!
2. Make the Pudding:
Next, prepare the chocolate pudding by following the instructions on the package, or whip up a homemade version if you prefer. Once it’s ready, set it aside.
3. Combine with Whipped Cream:
In a separate bowl, gently fold the whipped cream into the prepared pudding until it becomes light and fluffy. This adds a nice, creamy texture!
4. Layer Your Cups:
Grab your clear plastic or dessert cups. Start by adding a generous layer of your crushed cookie “dirt” at the bottom. This will be your base!
5. Add the Pudding:
Next, scoop a layer of the pudding mixture on top of the crushed cookies, spreading it out evenly. Follow this with another layer of crushed cookies, sprinkling them on top to create more “dirt.”
6. Drizzle for Effect:
Now, drizzle some orange frosting or melted candy melts along the inner sides of the cup. It’ll give a fun color pop and a Halloween vibe!
7. Finish with More Dirt:
Add a final sprinkling of crushed cookies on top to mimic soil. This will create a nice finished look for your graveyard.
8. Decorate Your Cup:
Use the whole or half chocolate sandwich cookies as tombstones, standing them upright in the dirt. Then, add gummy worms so they appear to be wiggling out of the “ground.”
9. Add Fun Decorations:
Top your cups with candy grave markers, sprinkle some edible greenery, and place a few edible flowers if you like. This will add to the spooky, festive feel!
10. Chill and Serve:
Finally, chill the cups in the refrigerator for at least 30 minutes to let the pudding set. Once ready, serve and enjoy these fun, creepy Graveyard Dirt Cups!
These delightful treats are sure to be a hit at any Halloween party!
Can I Use Different Types of Cookies?
Yes! While Oreos are traditional, you can substitute any chocolate sandwich cookies or even chocolate wafers. Gluten-free cookies also work well if needed.
How Do I Store Leftover Graveyard Dirt Cups?
Store leftovers in an airtight container in the refrigerator for up to 3 days. If the layers blend together, give them a gentle stir before enjoying again.
Can I Prepare These Ahead of Time?
Definitely! You can assemble the cups the day before. Just cover them and keep them chilled in the refrigerator. Add any final decorations right before serving for the best presentation.
What Can I Use Instead of Whipped Cream?
If you’re looking for an alternative, coconut whipped cream or any non-dairy whipped topping makes a great substitution. It helps maintain the light and fluffy texture of the cups!