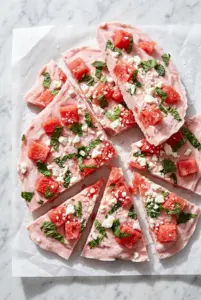
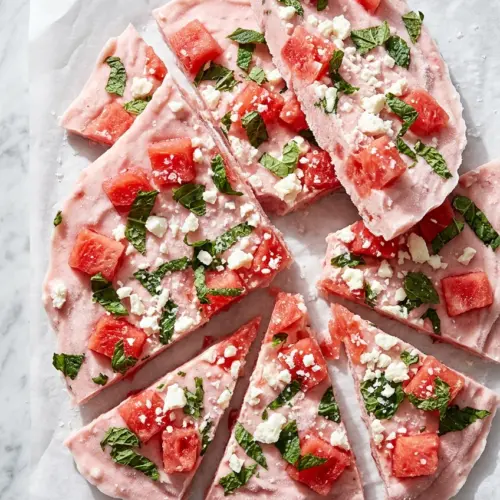
Pale pink frozen bark with watermelon, feta, and mint has the kind of sweet-salty snap that disappears fast once it hits the table. The base freezes into a clean, refreshing slab, while the feta stays creamy enough to read as a real contrast instead of a garnish. It looks playful, but it eats like a smart little dessert that knows exactly what it’s doing.
What makes this version work is the balance: enough watermelon to taste bright and juicy, just enough honey to round out the acidity, and a little lime zest to keep the flavor from going flat in the freezer. The feta and mint go on top after the base is spread, so they stay distinct and don’t melt into the fruit. That gives you cold, crisp edges, soft bits of melon, and salty pockets in every bite.
Below, I’ve laid out the texture cue that matters most before freezing and a few useful swaps if you want to lean sweeter, saltier, or a little more elegant for serving.
The watermelon base froze into a clean, sliceable layer, and the feta stayed pleasantly salty instead of disappearing into the fruit. I broke off one piece for a taste and ended up going back for three more.
Watermelon Feta Mint Frozen Bark is the kind of sweet-salty summer dessert that breaks into crisp, refreshing shards. The layered toppings stay bright and distinct after freezing, making it perfect for easy entertaining. Pin it before your next warm-weather dessert night. #WatermelonFetaBark #FrozenBark #SummerDessert #WatermelonRecipe
The Trick Is Freezing a Thin Base Before the Toppings Get Heavy
The biggest mistake with frozen bark is building it too thick or too wet. Watermelon carries a lot of juice, which means a deep layer can freeze icy and a topping-heavy surface can slide around before it sets. Spreading the blended fruit into a thin, even layer gives you a clean snap instead of a slushy block, and it helps the bark freeze through in the time the recipe promises.
The other thing that matters is how you treat the toppings. The watermelon cubes need to be pressed lightly into the base so they stay put, and the feta should be scattered after the surface is spread smooth. If you dump everything on all at once, the bark gets lumpy and the salt doesn’t distribute evenly. Gentle pressure is enough here; you’re trying to anchor the toppings, not bury them.
What Each Ingredient Is Doing in This Bark
- Seedless watermelon — This is the body of the bark, so use ripe watermelon with good flavor. If it tastes bland out of the bowl, it’ll taste bland frozen. Seedless is important here because you want smooth blending and easy eating. If you only have seeded watermelon, remove the seeds before measuring.
- Feta cheese — Feta gives the bark its salty edge and creamy crumble. A firmer block feta crumbled by hand holds shape a little better than pre-crumbled feta, which can be drier and finer. Goat cheese will work in a pinch, but it tastes tangier and softer.
- Fresh mint — Mint needs to be fresh here. Dried mint won’t give you the clean, cooling lift that keeps this from tasting one-note. Tear the leaves instead of chopping them so they stay readable on the surface and don’t bruise into dark bits.
- Honey, lime zest, and lime juice — Honey rounds out the watermelon, while lime adds enough sharpness to keep the bark lively after freezing. The zest matters more than people expect because it carries the fragrant citrus note that juice alone can’t deliver. If your melon is very sweet, you can reduce the honey slightly, but don’t skip the citrus.
- Flaky sea salt — This is the finishing move. Regular table salt disappears too fast and can taste harsh in a frozen dessert, while flaky salt gives you little pops of salt that hit after the watermelon sweetness.
The 4 Hours That Matter Most
Blending the Watermelon Base
Blend 4 cups of the watermelon with the honey, lime juice, and lime zest until the mixture looks completely smooth and pale pink. You don’t want visible chunks in the base, because frozen pieces turn icy and interrupt the clean snap of the bark. If your blender struggles, stop and scrape once rather than overworking it into foam. Foam traps air and gives you a lighter, less even freeze.
Spreading It Thin and Fast
Line a rimmed baking sheet with parchment and pour the mixture on right away. Spread it into an even layer about 1/2-inch thick with an offset spatula, working from the center outward. If the layer is too thin, it becomes fragile and breaks before the toppings set. If it’s too thick, the middle stays softer than the edges and the bark loses that crisp bite.
Adding the Toppings Before the Freeze
Scatter the remaining watermelon cubes over the surface, then add the feta and mint. Press everything down lightly with your palm so the pieces sit flush with the base. That little step keeps the toppings from falling off when you break the bark apart. Finish with flaky salt while the surface is still tacky so it actually sticks.
Freezing Until the Center Is Firm
Freeze the bark uncovered for at least 4 hours, or until the center feels as solid as the edges when you press it. If you try to break it too early, the middle bends instead of snapping and the toppings slide. Once it’s fully set, break it into irregular shards and serve right away. This bark softens quickly at room temperature, which is part of what makes it feel fresh.
How to Make This Bark Sweeter, Saltier, or Dairy-Free
For a sweeter dessert-style bark
Add an extra teaspoon of honey and keep the lime zest in place. That pushes the flavor toward a more dessert-like finish without making the base icy or dull. The bark will still taste fresh, but the watermelon reads softer and rounder.
For a brighter, more savory version
Increase the lime zest a little and use a generous pinch of flaky salt. That gives you a sharper contrast between the melon and the feta, which is the direction to take if you want this to feel more like a chilled appetizer or palate cleanser. Don’t add more juice unless your watermelon is very sweet, or the base can turn soft.
For a dairy-free version
Skip the feta and add chopped toasted pistachios or a little coconut yogurt dolloped in small amounts after the base is spread. You lose the salty creaminess that makes the original special, but you gain crunch and a cleaner fruit-forward finish. If you use coconut yogurt, keep the layer thin so it freezes cleanly.
For serving later in the day
Break the bark and store the pieces in a single layer with parchment between layers if needed. It holds best when kept frozen until the last minute. After about 10 minutes on the counter, the melon starts to soften and the edges lose their snap.
Answers to the Questions Worth Asking
Watermelon Feta Mint Frozen Bark
Equipment
- 1 sheet pan
Ingredients
Watermelon base
- 4 cup seedless watermelon Cubes blended until completely smooth (about 1/2-inch pieces).
- 1 tbsp honey Helps flavor the pale pink base.
- 1 tbsp lime juice Adds brightness to the frozen bark base.
- 1 tsp lime zest Adds lime aroma throughout the slab.
Toppings and mix-ins
- 1 cup seedless watermelon Remaining cubes scattered on top and pressed lightly so they sit flush.
- 4 oz feta cheese Crumbled into visible white flecks.
- 2 tbsp fresh mint leaves Torn for better adhesion and speckled texture.
- 1 flaky sea salt Pinch for a salty finish.
Instructions
Blend the watermelon base
- Add 4 cups seedless watermelon cubes, honey, lime juice, and lime zest to a blender, then blend until completely smooth, about 30 seconds. The mixture should be fluid and uniformly pale pink with no chunks.
Assemble the bark slab
- Line a rimmed sheet pan with parchment paper. Pour the watermelon base onto the sheet and spread to an even 1/2-inch layer using an offset spatula, working quickly before it starts to set.
Add watermelon chunks
- Scatter the remaining 1 cup seedless watermelon cubes across the surface, pressing them lightly into the base so they sit flush rather than rolling off. Arrange them evenly for consistent bites.
Add feta, mint, and salt
- Distribute the crumbled feta evenly over the slab. Follow with the torn mint leaves and a pinch of flaky sea salt for balanced flavor and texture.
Press toppings to adhere
- Press everything gently with your palm so toppings adhere to the surface. Keep pressure light to avoid disturbing the base layer thickness.
Freeze and serve
- Freeze uncovered for a minimum of 4 hours, or until completely solid throughout. The center should feel as firm as the edges when pressed.
Break into shards
- Break into irregular shards and serve immediately. Keep pieces from sitting at room temperature for too long to maintain the firm texture.